Crawl spaces often attract unwanted visitors, moisture, and other problems. A well-constructed crawl space vent cover can mitigate many of these issues, but off-the-shelf solutions can be costly. This guide will take you through the materials, methods, and considerations for crafting DIY crawl space vent covers, ensuring your home remains secure, dry, and energy-efficient.
The Problem Of Open Crawl Space Vents
Historically, homes were built with crawl space vents to allow air to circulate under the house, preventing moisture accumulation that could lead to mold growth and wood rot. While this method sounds great in theory, it sometimes falls short in practice, especially in regions with high humidity or during colder months.
Moisture is the main enemy of any crawl space. It can seep in from the ground, condense on cool surfaces, and create an environment ripe for mold, mildew, and wood decay. Proper ventilation is supposed to mitigate this, but in humid climates, open vents can let in more moisture than they let out. Moreover, pests like rodents and insects can use these openings as entry points into your home, creating additional problems.
Given these challenges, covering the vents may be a solution.
Materials For DIY Crawl Space Vent Covers
Crafting your own crawl space vent covers starts with a smart choice of materials. They must ensure durability, effectiveness, and cost-efficiency. Here’s a breakdown of the most popular options.
Plywood
Plywood is a popular choice for many DIY enthusiasts due to its affordability and ease of use. It’s sturdy enough to withstand external elements and can be easily cut to fit any vent size. For best results, use exterior-grade plywood, which is treated to resist moisture and decay. Consider also painting or sealing the plywood with a weather-resistant coating to enhance its durability.
Foam Insulation Board
If you live in colder climates, consider foam insulation board. It’s an excellent material for creating vent covers that help maintain a stable temperature in the crawl space: lightweight, easy to cut, and provides reliable protection against cold air.
A common method is to cut the foam board to fit snugly inside the vent opening, securing it in place with adhesive or brackets. For a more permanent solution, consider framing the foam board with plywood or metal, which will provide additional protection against the elements.
Magnetic Covers
Magnetic covers offer a convenient, reusable solution for metal vents. These covers can be easily applied and removed, making them ideal for seasonal adjustments.
The downside to magnetic covers is that they are only effective on metal surfaces and may not provide a perfect seal, particularly if the vent surface is uneven or rusted. They also offer minimal protection against pests. Nevertheless, for ease of use, they are hard to beat, particularly in regions with mild winters where extreme insulation isn’t necessary.
Custom Fabricated Metal Covers
This is a more permanent and durable solution that can be designed to fit your specific vent dimensions. Custom-fabricated metal covers are typically made from aluminum or galvanized steel and designed with louvers or slats to allow air circulation.
While more expensive and labor-intensive to create, metal covers also require minimal maintenance and offer superior resistance to the elements and pests.
Wire Mesh
If you’re only concerned with keeping pests out, wire mesh will prevent insects and small animals from entering the crawl space. The mesh should be fine enough to block even the smallest pests—look for mesh with openings smaller than a quarter of an inch.
Stainless steel wire mesh is highly recommended due to its resistance to rust and corrosion, ensuring the vent cover’s longevity. For added durability, you can frame the mesh with wood or metal to make installation easier and more secure.
Step-By-Step Guide To Building Your DIY Crawl Space Vent Cover
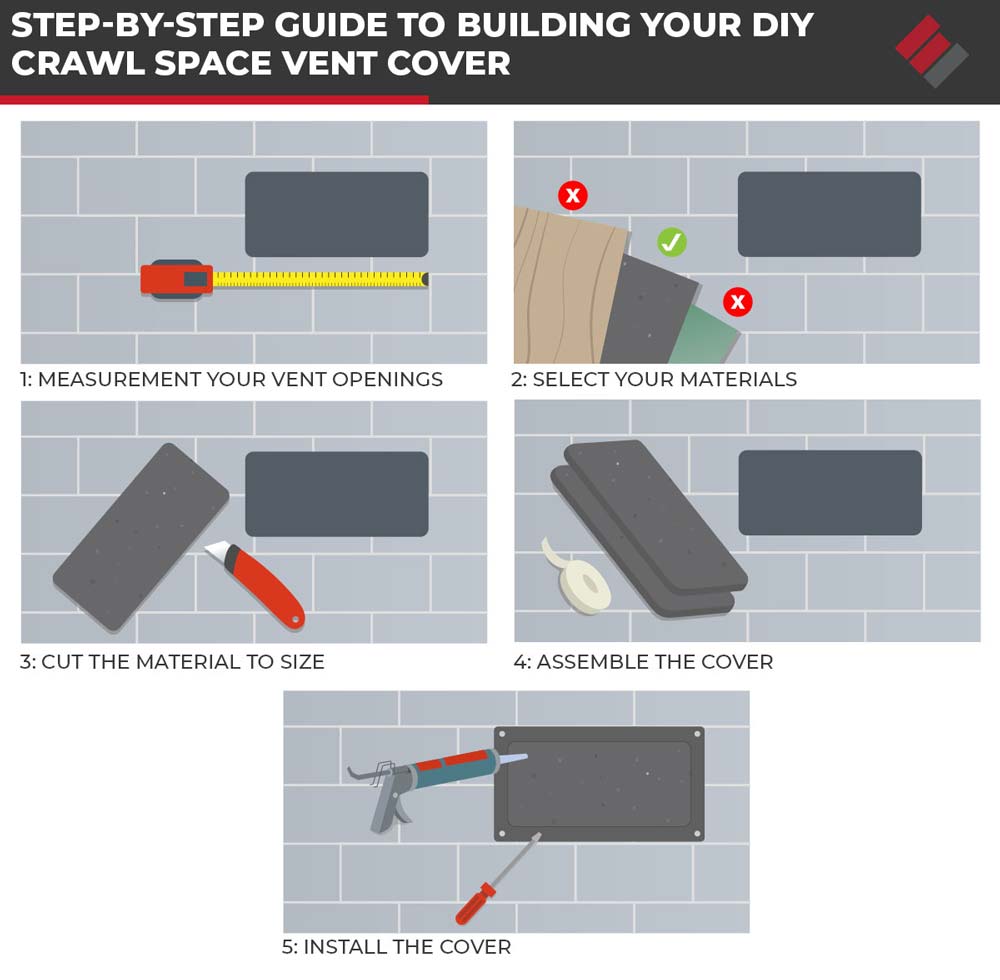
Creating your own crawl space vent cover can be a straightforward process if you follow these steps:
1. Measure Your Vent Openings
Start by measuring the dimensions of each vent opening to ensure that your cover fits snugly in order to provide the necessary protection. Use a tape measure to record the vent’s height, width, and depth.
2. Select Your Materials
Choose the most appropriate materials based on your crawl space’s needs and your local climate. Consider factors such as durability, ease of installation, and the specific challenges your crawl space faces—whether that’s moisture, pests, or cold air.
3. Cut The Material To Size
Using your measurements, cut the chosen material to fit the vent openings. For plywood or foam board, a circular saw or utility knife will work well. For wire mesh, tin snips or a wire cutter will be necessary. Ensure the edges are smooth and even.
4. Assemble The Cover
If you’re using multiple materials, such as a combination of plywood and mesh, now is the time to assemble the components. Secure the mesh to the plywood using screws or a staple gun, and tightly seal all joints to prevent gaps. You can also apply a weatherproof sealant around the edges for added protection.
5. Install The Cover
Finally, position the cover over the vent opening and secure it in place. This can be done using screws, brackets, or adhesive, depending on the material and the design of the vent. Ensure the cover is firmly attached and check for any gaps or loose areas that might allow pests or moisture to enter.
Seasonal Considerations And Maintenance
While your DIY crawl space vent covers will provide effective protection, they are not a set-it-and-forget-it solution. Regular maintenance and seasonal adjustments will ensure their ongoing effectiveness.
Winterization
In colder climates, you need to block out cold air to prevent pipes from freezing and maintain a stable temperature in the crawl space. This may require temporarily sealing vents with foam insulation boards or magnetic covers during winter. Be sure to check the seals periodically to ensure they remain tight.
Summer Ventilation
During the warmer months, ventilation becomes more critical to prevent moisture buildup. Consider removing or adjusting covers that were sealed during the winter to allow for better airflow. If you previously used foam boards or magnetic covers, you can easily remove or replace them with mesh covers.
Routine Inspections
Inspect your vent covers at least twice a year—once in the spring and once in the fall. Check for any signs of wear, damage, or gaps that could compromise their effectiveness. Pay particular attention to signs of pest entry or moisture accumulation, and address any issues immediately to prevent more significant problems.
When To Consider Professional Help
If you’re dealing with severe moisture issues, persistent pest problems, or structural concerns within your crawl space, it’s wise to consult with a professional.
At Epp, we offer professional crawl space waterproofing services based on years of expertise. Our team will assess the situation and offer tailored solutions that go beyond what DIY covers can provide. Based on your specific needs and budget, we might recommend additional measures such as vapor barriers, sump pumps, or dehumidifiers to further protect your crawl space from moisture and mold.
If you’re ready to take the next step in securing your home, contact us today to request a quote for professional crawl space waterproofing services. Our team is here to help!