
Concrete is popular because it’s solid and versatile, perfect for everything from driveways to sidewalks to patios and foundations. It’s easy to maintain with a good pressure wash and adaptable to any style or design you prefer, making it an excellent choice for outdoor living.
However, even though concrete is one of the most durable construction tools, it can still get damaged over time. Cracks, chips, and other signs of wear can appear, leaving you feeling less than proud of your property.
Can you fix broken concrete? Absolutely! You can repair and restore concrete with the right tools, materials, and methods, making it last longer and look great. This guide will show you how to fix damaged concrete so your surfaces stay solid and reliable for years. We’ll also review some expert tips on maintaining the beauty of your repairs so your hard work doesn’t go to waste.
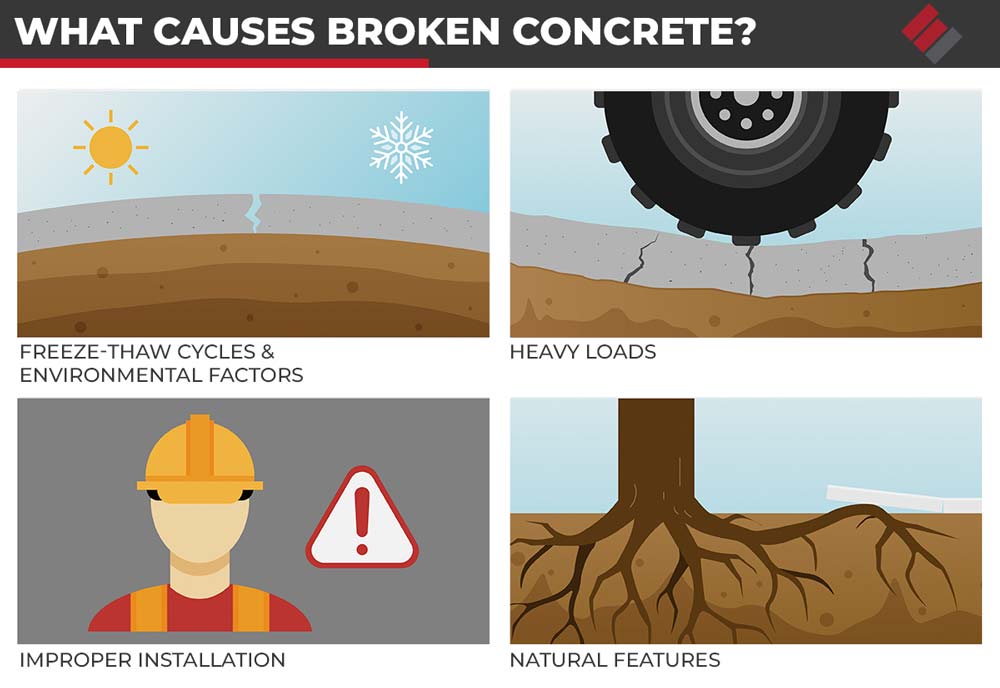
What Causes Broken Concrete?
Before starting the repair process, it’s essential to understand what causes concrete to break. Here are a few of the most common reasons for broken concrete.
Freeze-Thaw Cycles and Environmental Factors: In colder climates, water can seep into concrete, freeze, and expand, causing the concrete to crack. While we are used to these natural cycles, the effects increase rapidly when temperatures or extreme weather events like floods, droughts, or blizzards occur. Exposure to chemicals and salts also degrades the porousness of the concrete.
Heavy Loads: The average car weighs 3000 lbs, so having a few on your driveway can stress your concrete. Excessive weight from heavy equipment can add to this stress, leading to cracks and breaks.
Improper Installation: Concrete combines sand or gravel, cement, and water. It also needs a significant amount of time to cure properly. When poorly mixed or inadequately cured, concrete can be more prone to damage since its chemical barriers to things like water are compromised.
Natural Features, such as Trees: You want to enjoy the shade of your new concrete porch or patio, so don’t think about expanding tree roots or shifting soils. Roots can push up from the ground to crack your concrete surface, and shifting soils can lead to uneven slabs, so keep that in mind when planning your yard.
Step-by-Step Guide To DIY Concrete Repair
Repairing concrete yourself can be rewarding, saving you time and money while restoring your surfaces. In this step-by-step guide, we’ll walk you through the process of DIY concrete repair, making it straightforward and manageable for you.
Step 1:Assessing The Damage
The first step in fixing broken concrete is to assess the extent of the damage. Small cracks and chips can often be repaired with minimal effort, while more significant breaks may require more extensive work. Here’s how to evaluate the damage:
- Inspect the Surface: Carefully examine the concrete surface for cracks, chips, and other signs of wear. Note the size and location of each area of damage and whether it is concentrated in one area, which may indicate structural issues.
- Check for Underlying Problems: Sometimes, surface damage is a symptom of more significant underlying problems, such as a shifting foundation or poor drainage. Addressing these issues is crucial to prevent further damage to your yard and home.
- Determine the Repair Method: Decide whether the damage can be repaired with a simple patch or if more extensive measures are needed. Call a foundation repair specialist near you for a professional evaluation when in doubt.
Step 2: Gathering The Necessary Tools And Materials
Once you’ve assessed the damage, it’s time to gather the tools and materials you’ll need for the repair. Depending on the extent of the damage, you may need:
- Concrete patching compound or epoxy
- Concrete resurfacer
- Chisel and hammer
- Wire brush or grinder
- Trowel or putty knife
- Concrete sealer
- Safety gear (gloves, goggles, mask)
Getting the standard store-brand for most of these materials will help save you money, and many brands have ready-made sets available for purchase. Chat with your local hardware store or home repair store staff to find the right tools for your job.
Step 3: Do Your Repair Work
Repairing Small Cracks And Chips
A straightforward patching compound or epoxy can do the trick for small cracks and chips. Here’s how to repair minor damage:
- Clean the Area: Use a wire brush or grinder to remove any loose debris, dirt, or dust from the damaged area. This will ensure the patch adheres properly.
- Prepare the Patching Compound: Follow the manufacturer’s instructions to mix the concrete patching compound or epoxy as directed so you can rely on the material.
- Apply the Patch: Use a trowel or putty knife to apply the compound to the damaged area, pressing it into the crack or chip. Smooth the surface with the trowel.
- Let It Cure: Allow the patch to cure according to the manufacturer’s instructions. This typically takes several hours to a day. Always err on the side of longer rather than shorter, and keep kids and pets away from the area to avoid accidents.
- Seal the Surface: Once the patch has cured, apply a concrete sealer to protect the repaired area from future damage.
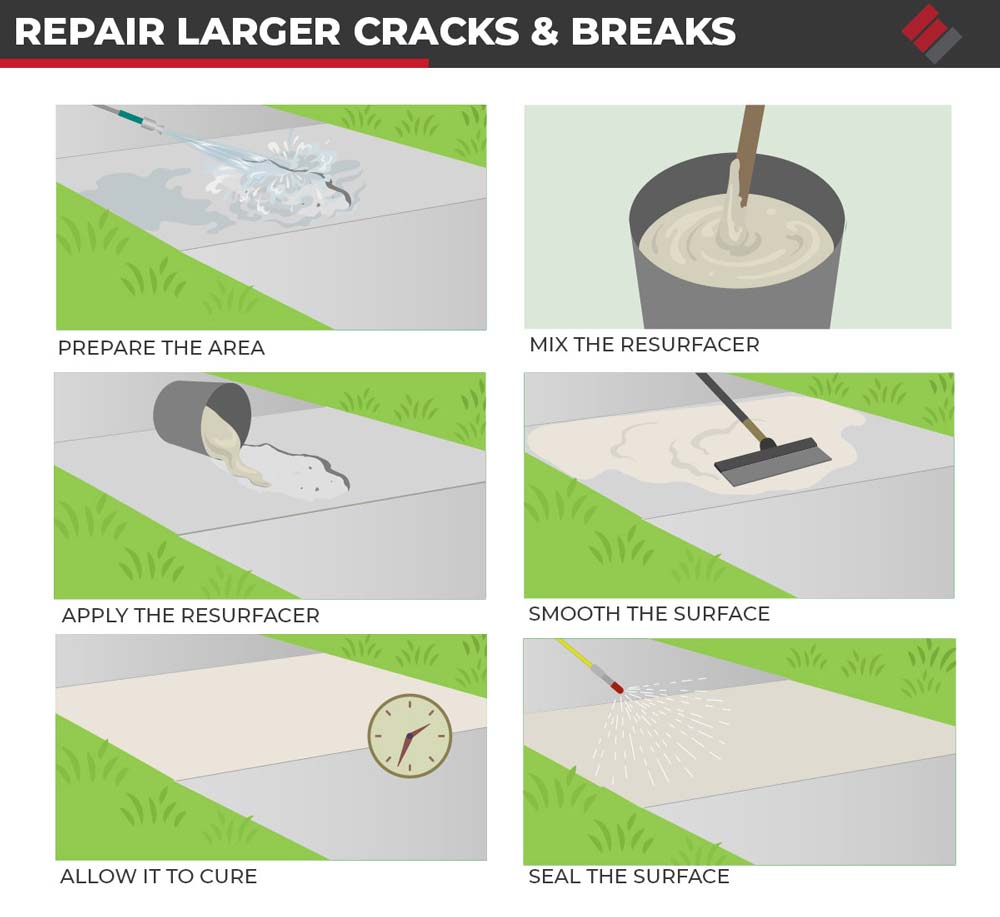
Repairing Larger Cracks And Breaks
Larger cracks and breaks may require more extensive repairs, such as using a concrete resurfacer or replacing a concrete section. While the basic steps are the same, these repairs will take longer to execute. Here’s how to tackle more significant damage:
- Prepare the Area: As with more minor repairs, start by cleaning the damaged area thoroughly. Use a chisel and hammer to remove any loose or damaged concrete.
- Mix the Resurfacer: Follow the manufacturer’s instructions to mix the concrete resurfacer. This product is designed to bond with existing concrete and create a smooth, durable surface.
- Apply the Resurfacer: Pour it over the damaged area, using a trowel to spread evenly. Work quickly, as the resurfacer can begin to set within a few minutes.
- Smooth the Surface: Use a concrete float to smooth the resurfacer and blend it with the surrounding concrete. Multiple layers may be needed for a uniform finish.
- Allow It to Cure: Let the resurfacer cure according to the manufacturer’s instructions. This process can take several hours to a few days. Again, waiting longer rather than rushing this process is best, as a poorly cured concrete repair will waste your hard work.
- Seal the Surface: Once the resurfacer has cured, apply a concrete sealer to protect the newly repaired surface.
Preventing Future Damage
Repairing broken concrete is only part of the equation; preventing future damage is equally important. Here are some tips to keep your concrete surfaces in top shape:
- Seal Regularly: Apply a concrete sealer every few years to protect against water, chemicals, and other damaging elements.
- Address Drainage Issues: Ensure proper drainage around your concrete surfaces to prevent water from pooling and causing damage.
- Avoid Heavy Loads: Limit the weight placed on concrete surfaces, especially if not designed to support heavy vehicles or equipment.
- Perform Routine Maintenance: Regularly inspect your concrete surfaces for signs of wear and tear and address any issues promptly to prevent them from worsening.
- Use Protective Mats: Place protective mats under heavy equipment or vehicles to distribute weight more evenly and reduce stress on the concrete.
Epp Foundation Repair Can Fix Broken Concrete With Ease
While DIY enthusiasts can tackle minor concrete repairs, some situations require the expertise of a professional. Suppose the damage is extensive or affects the structural integrity of the concrete, leaving you worried about the stability of your home and your family’s safety. In that case, consulting a professional construction team is the right move.
At Epp Foundation Repair, we have over 30 years of experience helping homeowners like you improve and elevate their homes in Nebraska, Iowa, Kansas, and Missouri. Our friendly team of experts can assess the damage, recommend the best action, and ensure the repairs are done correctly and safely, giving you the peace of mind of a job well done. Call for your free estimate today!